 Image 1
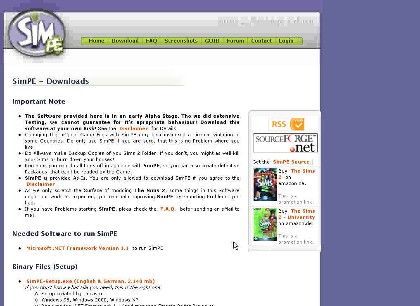
This page will give you step by step instructions on how to get and use the Re-coloring Wizard of SimPE. Step 1: The first thing you want to do is get the right software. Go to this web site http://sims.ambertation.de/download.shtml (as shown in image 1) You can also click on the image to go there. When you get there make sure to read the disclaimer and say AGREE if you do. Next download SimPE, SimPE Photostudio Templates, and Colour Options Enabler. If you don’t have Microsoft Net Framework Version 1.1, then you will need to download that too in order to run SimPE. If you are not sure whether or not you have it you can try to run SimPE and if it doesn’t work then go back to the web site and download Microsoft Net Framework 1.1 too. Step 2: Once you have finished downloading all the software as stated above you need to install the software in this order: 1st (if you downloaded it) install Microsoft Net Framework 1.1, then SimPE, then, SimPE Photostudio Templates, and finally Colour Options Enabler. Continue to Step 3.
|
|
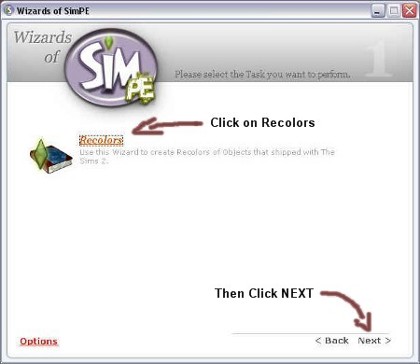
Image 2 Step 3: Once you have successfully installed all of the software go to your Programs, then SimPE, then click on Wizards of SimPE. When the main screen opens (as shown in image 2) click on RECOLORS. It will then begin to access all of the objects that came with the game. This will take about 30 seconds. Continue on to Step 4.
|
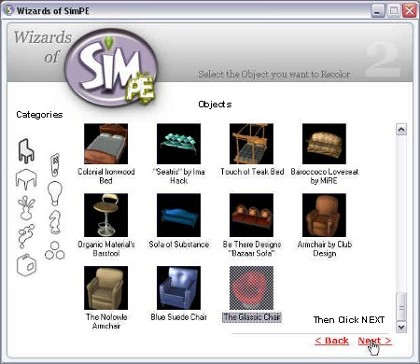
Image 3
Step 4: Once it has finished click on the category then the object that you want to edit and then click NEXT. (as shown in image 3) Continue on to Step 5.
|
|
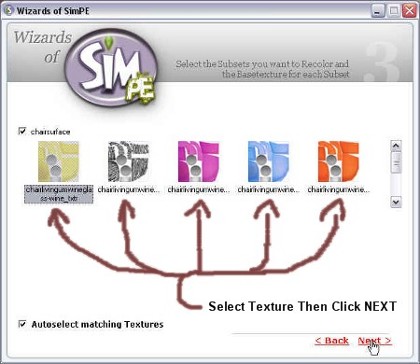
Image 4 Step 5: Next select the texture that you want to edit (as shown in image 4) and click NEXT. Continue on to Step 6.
|

Image 5 Step 6: Now click on the texture that you want to edit again and click on EXPORT. (as shown in image 5) Continue on to Step 7.
|
|
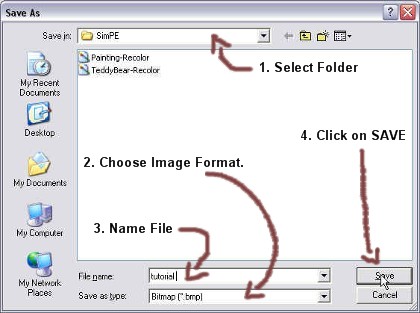
Image 6 Step 7: Then select the folder (1.) that you want to export the image file too, then select the type of image file you want it to be (2.) *I would recommend Bitmap (.bmp) because most editing programs can edit it.* Then type in a name for your image file (3) and then click SAVE. (4) Continue on to Step 8.
|

Image 7 Step 8: Next go open the program that you want to edit it in and open the image file that you just exported (shown in image 7). For example MS Paint or a photo editor. (Note: you do not need to close SimPE. In fact it is just easier to leave it open. ) Continue on to Step 9.
|
|

Image 8 Step 9: Now edit it anyway you like. (as shown in image 8) Get really creative! Maybe even put a picture on it of some flowers you took, etc. It is good idea to do a few practice runs of SimPE just to get a feel for it before you really start getting serious. Make sure you save your work and then close the editing program! Continue on to Step 10.
|
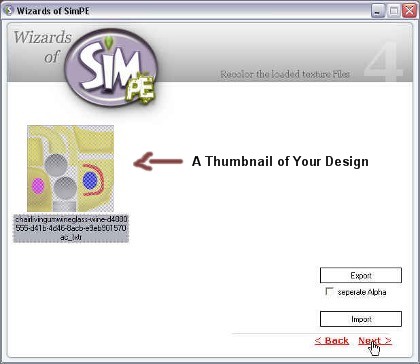
Image 9 Step 10: Now go back to your SimPE window and select the texture that you exported and click on IMPORT. Now go and select the image file that you just edited and click OK. De-select the texture thumbnail and you new design will display. (as shown in image 9) Then click NEXT. If your image does not appear it could be that you didn’t save or that they don’t have it quite worked out so that you can re-color it. You can go to their web site and notify them of the problem or just wait until they come out with a new patch or version of the software. Continue on to Step 11.
|
|
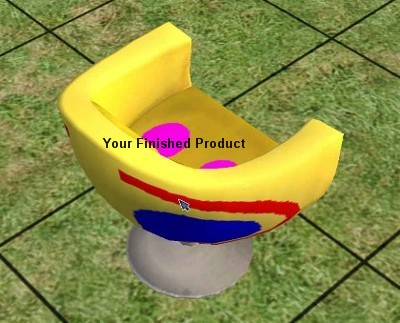
Image 10 Step 11: All you have to do now is run your game and go to the object you re-colored and now your new design is there! (as shown in image 10) It’s as easy as that! If you have any more questions you can e-mail me at webmaster@sims2.itgo.com or at my secondary one postmaster@sims2.itgo.com Happy Simming!:-)
|

|
|

|

|
|

|

|
|

|

|
|

|
|
|
|
|
|
|
|
|
|
|
|
|
|
|
|
|
|
|
|
|
|
|
|
|